
How to Install Anaconda in Ubuntu 22.04
Anaconda is a very popular package management tool for R and Python, supporting data science, analysis, and machine learning, with a very friendly graphical interface. It comes loaded with everything you could need to do anything in these domains, along with the Python interpreter. Such an architecture makes it independent from the underlying system.
With Anaconda, at times you don’t have to worry about resolving complex dependencies manually. The package manager for Anaconda, known as Conda, automatically keeps all the packages (installed through it) updated. It makes the installation of libraries and their management a breeze.
Anaconda is available on macOS, Windows, and a lot of Linux distros with individual, team, commercial, and enterprise editions. You can install the individual edition free of charge so that students and others can learn how to handle tasks related to data science, analysis, and machine learning using Anaconda. All the paid editions provide an extended range of functionalities to enable large-scale projects.
So, how can you leverage so much power on your computer running Ubuntu 22.04? Let me walk you through the installation process.
Downloading the installer
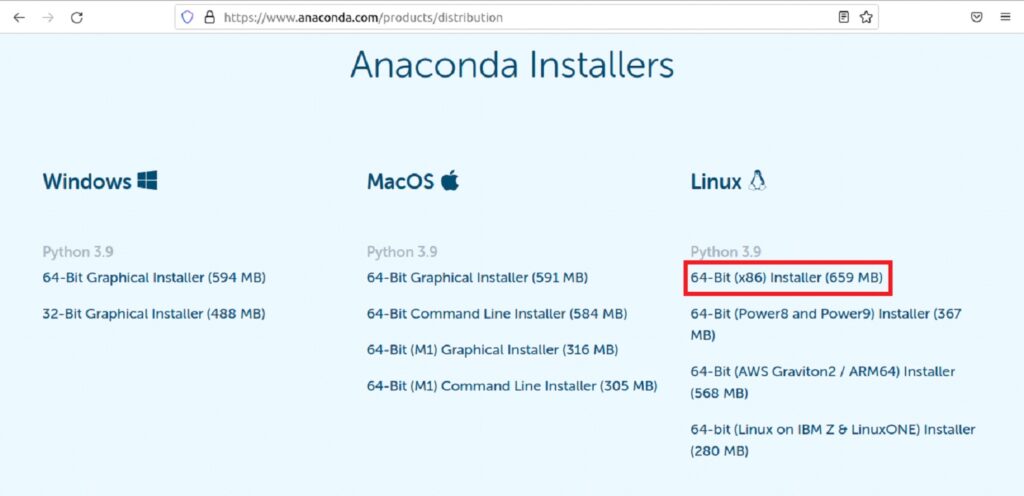
Unlike many other applications, you cannot install Anaconda through the default Ubuntu system repository, we have to download the installer through the official website for Anaconda. On their downloads page, you will be presented with the installed options for all the supported operating systems. Select the highlighted one from the screenshot.
After it is done downloading, we now need to utilize the Terminal to install Anaconda on your computer.
Installing Anaconda
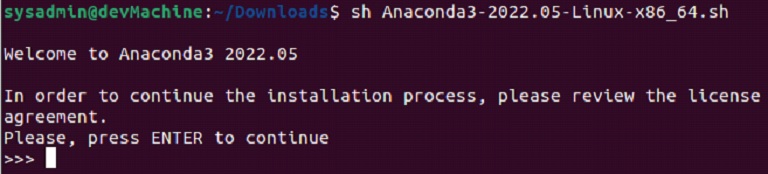
When you see that the download has been completed, open up the terminal in your Downloads directory. To start the installation, you need to run:
$sh Anaconda3-2022.05-Linux-x86_64.sh
Install-Anaconda-Ubuntu-22-04
The installation wizard will start up within the terminal. You will need to press return to start the configuration process. If you don’t want to read through the whole “End User License Agreement”, you can then press ‘q’ and type ‘yes’ to agree to all the terms and conditions.
By default, the wizard will create the installation directory under your user, but if you want to install it somewhere else, you can specify that as well. If you’re ok with the default location (like we are), you can just press return.
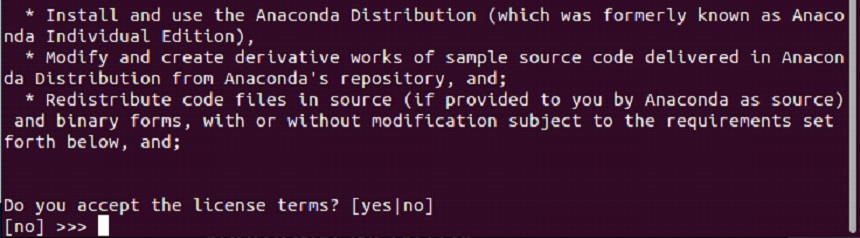
When the installation completes, you will be prompted with:
Here you need to type in yes and press return to complete the installation process.
Setting up the environment variables
Before we start using Anaconda, we need to add the folder path to the system path, which will allow us to access the command tool from anywhere, without having to switch to the installation directory every time. You can run:
$echo “export PATH=$PATH:/home/sysadmin/anaconda3/bin">> ~/.bashrc
You need to replace “sysadmin” with your username.
Before you are ready to start using Anaconda on your computer, you need to reload your shell.
Reloading the shell
You need to reload your shell if you don’t want to restart your computer before using Anaconda. You can do so using:
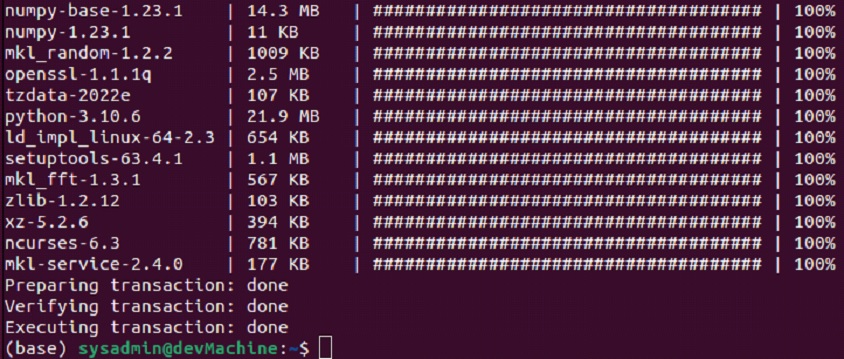
$source ~/.bashrc
![]()
Using Conda
Now we are all set up. Let’s set up a new environment and create a sample project through the terminal.
Creating an environment
To start, we need to run:
$conda create -n testenv

Here ‘testenv’ is the name we’ve given to the environment we just created for your project. With the output from this command, our environment is ready and we are ready to install packages with the next commands.
Installing packages
Installing packages through the terminal is pretty straightforward. Let’s say you want to install Python along with NumPy in your environment. You can run:
$conda install -n testenv python numpy
In this command, we are specifying that we want to install python and numpy in the “testenv’ environment that we created in the last step.
Using this syntax in this command, we can install any package in any of our created environments.
Activating the environment
Before you start working on your code, you’ll need to activate your environment. You can activate it using:
$conda activate testenv

Deactivating the environment
When you’re done working on your project, make sure to deactivate your environment using the following:
$conda deactivate

Deactivating the Conda base environment
If you want to keep your anaconda installation separate from the rest of the workflows and not fire up when you open up your terminal, you can deactivate the Conda base environment using the following:
$conda config --set auto_activate_base false
![]()
Using the Anaconda GUI
If you prefer to use the GUI over the terminal, Anaconda has you covered over there as well. The Anaconda Navigator is the GUI of Anaconda. You can launch it through your terminal using:
$anaconda-navigator
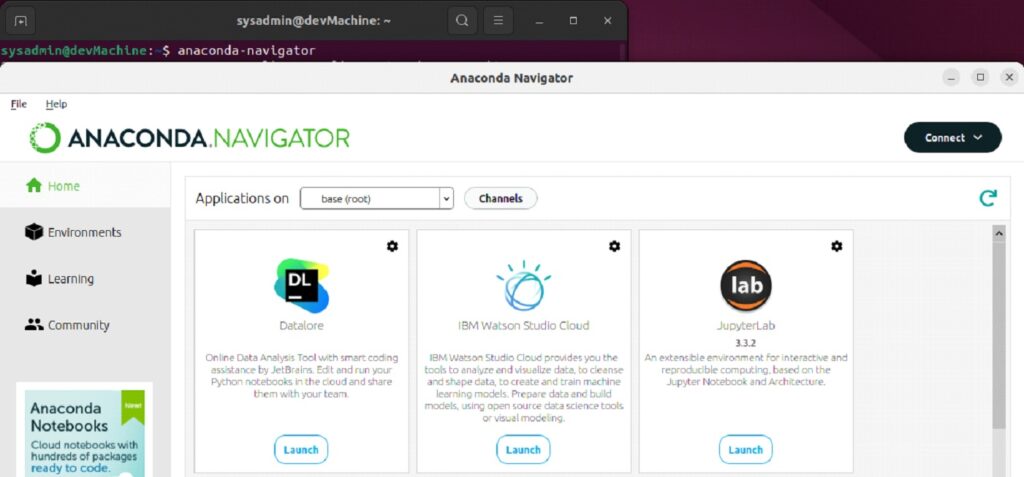
From here, you can do everything through the interface that we did through commands before.
Creating shortcuts
Unlike many of the other installers that automatically create a shortcut in the applications drawer, you have to manually create shortcuts for Anaconda.
Desktop Shortcut
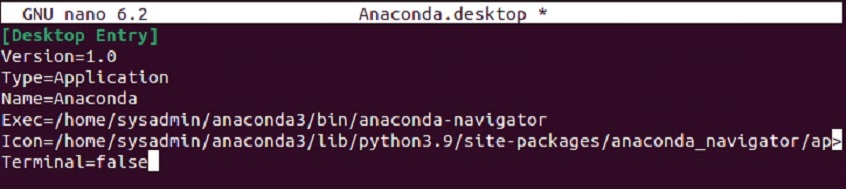
All you need to do to create the desktop shortcut is, open up your terminal on the desktop and type:
$nano Anaconda.desktop

When the file opens up, you need to copy the following into your newly created file:
[Desktop Entry]


Version=1.0

Type=Application

Name=Anaconda

Exec=/home/sysadmin/anaconda3/bin/anaconda-navigator

Icon=/home/sysadmin/anaconda3/lib/python3.9/site-packages/anaconda_navigator/app/icons/Icon1024.png
Terminal=false
NOTE: You need to replace the “sysadmin” text with your username.
Now save the file using “Ctrl+O” and then press Return, now exit from the file using “Ctrl+X”. As soon as you do that, you’ll see a new icon on your desktop.

It’s not ready to run yet. You need to right-click on it and select “Allow Launching”.
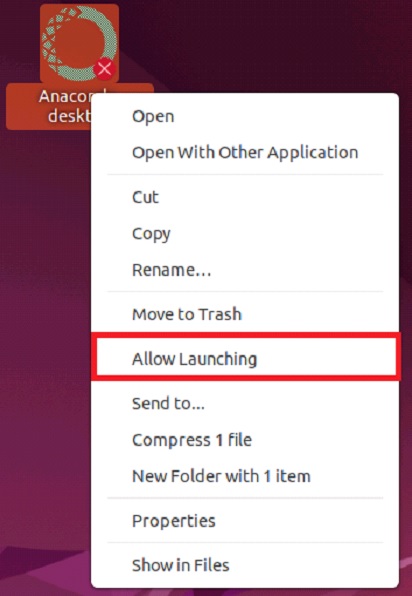
Now you can just double-click the icon to launch Anaconda Navigator.
Applications Shortcut
After the desktop shortcut is functional, you can head back into your terminal and type the following to create an applications shortcut for Anaconda.
$sudo cp ~/Desktop/Anaconda.desktop /usr/share/applications/
Now you can just also go into the applications drawer as well and launch Navigator from there.

Uninstalling Anaconda
Removing the configuration files
Before we uninstall Anaconda, let’s make sure that the configuration files and programs are removed.
$conda install anaconda-clean
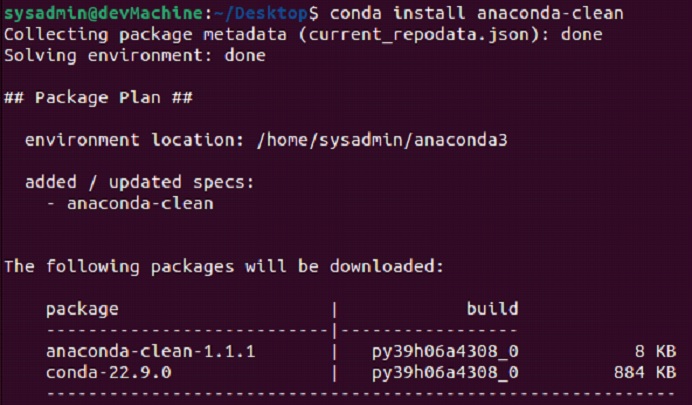
When this command completes, run:
$anaconda-clean –yes

If you want to remove Anaconda from your Ubuntu 22.04, you can use the following respectively in the terminal:
$rm -rf anaconda3
![]()
$rm -rf ~/anaconda3

$rm -rf ~/opt/anaconda3

These commands can help you get rid of Anaconda if you’ve installed it at any custom location.
Removing the environment variable
After removing Anaconda, you need to restore the environment variable to the original state using:
$sudo nano .bashrc

$sudo nano .profile

When both of the files open up, find the lines containing “anaconda3”, remove them and save the files. And you’re done.
Conclusion
Anaconda is an amazing and powerful platform for managing scientific computing tasks. You can easily run workloads for data analytics or science and handle large-scale processing duties with ease.
With this guide, you can easily get set up and start learning the platform. If at any step you run into any issues, feel free to engage us through the comments below and we will gladly help you out. Cheers.
