
How to Set Static IP Address on Debian 12?
A static IP address is an IP address that does not change/modify with time. It is useful for setting up servers, remote access, or other network services that require a fixed IP address (need to be reachable at a fixed location). By default, Debian 12 uses a dynamic IP address that is allocated by a DHCP server. However, you can configure your Debian 12 system to use a static IP address by editing the network configuration files.
This guide will explain all possible methods to set up a static IP address on Debian 12 along with the step-by-step instructions.
Prerequisite: Create a Backup File
Before network configuration, it is good practice to create a backup of the existing network settings via the “cp” command:
sudo cp /etc/network/interfaces /etc/network/interfaces.bak
How to Set Up a Static IP Address on Debian 12?
There are different methods to set up a static IP address on Debian 12, depending on the network interface you are using. You can use either the command line or graphical interface to configure your network settings.
To set up a static IP address on Debian 12, follow these:
- Method 1: Editing the /etc/network/interfaces File
- Method 2: Using the nmcli (Command-line Tool)
- Method 3: Using the nmtui (Text-based Interface)
- Method 4: Using NetworkManager (Graphical-based Interface)
Let’s begin with the first method.
Method 1: Set Up a Static IP Address on Debian 12 Editing the /etc/network/interfaces File
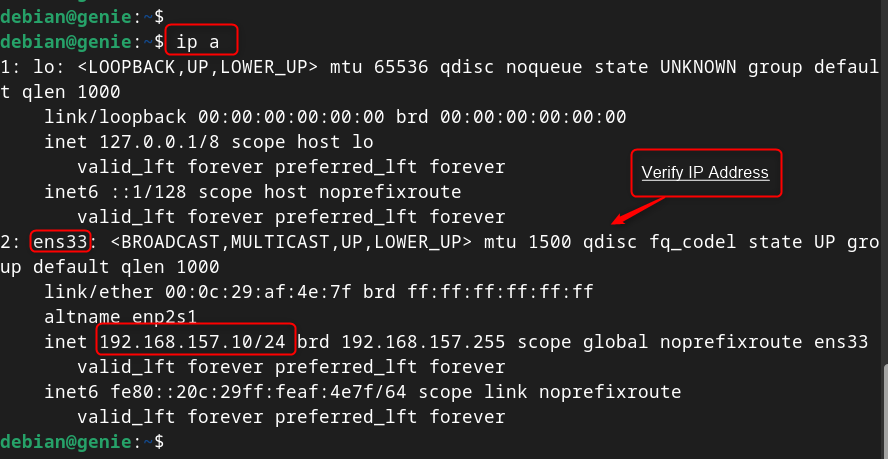
The “/etc/network/interfaces” file is a configuration file that defines how the network interfaces are configured on the system. To change an interface’s IP address, first check its current IP address:
ip a
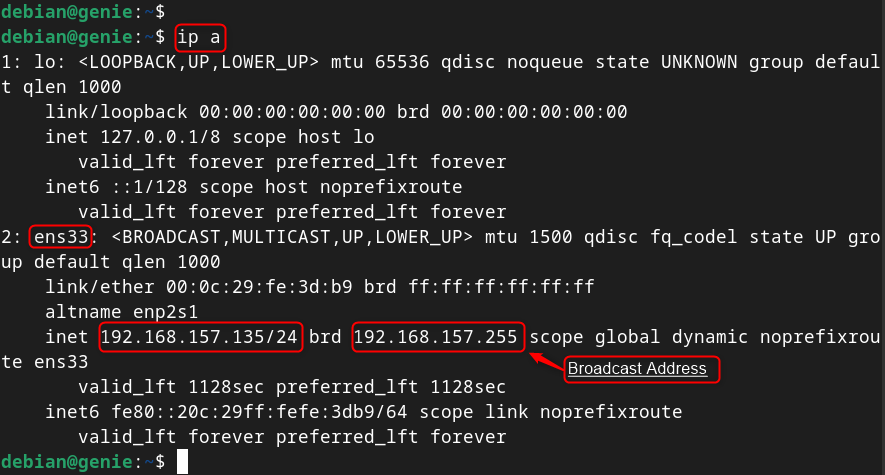
Here, the network interface “ens33” has the IP address “192.168.157.135”. The last IP address on the network is “192.168.157.255”, which is the broadcast address. The IP address must be in the range of “192.168.157.135” to “192.168.157.255”.
To set up a static IP address on Debian 12, edit the “/etc/network/interfaces” file and add the desired IP address, netmask, gateway, and DNS server for your interface. After saving the file, restart the network service to take effect as follow:
Step 1: Open /etc/network/interfaces File
First, access the /etc/network/interfaces file to edit the desired networking file via nano (editor):
sudo nano /etc/network/interfaces

Step 2: Configure Network Interface
Find the line that starts with “iface” and match to the network interface for configuration. For instance, to configure the ethernet interface “ens33”, add the following lines (address, netmask, gateway, and dns-nameservers):
auto ens33
iface ens33 inet static

address 192.168.157.135

netmask 255.255.255.0

gateway 192.168.157.135

dns-nameservers 8.8.8.8 8.8.4.4
Users can replace the values with your own:

Save and close the file by pressing Ctrl+O and then Ctrl+X.
Note: Users can find the network interface using the “nmcli connection show” command by following the “Device Name” column.
IMPORTANT: Users ensure the default gateway is the same as the assigned IP address (for NAT or Bridged Network). Otherwise, look for “iface ens33 inet dhcp” and change the word “dhcp” to “static” by following the above configuration.
Step 3: Restart Networking Service
Finally, restart the networking service using the “systemctl” command or reboot the system for the changes to take effect:
sudo systemctl restart NetworkManager.service

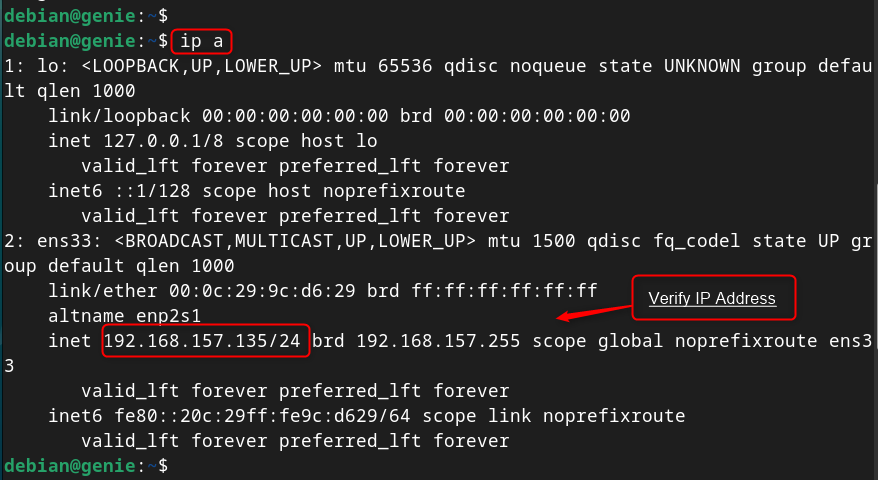
Step 4: Verify Set up IP Address
To check the static IP address on the running system, use the “ip” command with “a” utility:
ip a

Finally, the static IP address has been set up using the “/etc/network/interfaces” file on Debian 12.
Note: Each method has independent settings/configurations to set up a static IP address on the Debian system.
Method 2: Set Up a Static IP Address on Debian 12 Using the nmcli
The nmcli is a part of the “NetworkManager” package that allows users to manage network connections from the terminal. This tool specifies the IP address, prefix, gateway, and DNS server associated with the device.
To set up a static IP address on Debian 12 using nmcli, follow these steps:
Step 1: List Network Connections
To list all the available network connections on the system, use “nmcli” command with “connection show”. It prints the network connections along with the connection name, UUID, connection type and device name:
nmcli connection show

Step 2: Configure Network Connection
To configure the ethernet connection “ens33”, use the “Wired connection 1” in the below instructions:
Now, configure/modify connection settings. Such as IP address
- Assign/Set Static IP Address
sudo nmcli connection modify 'Wired connection 1' ipv4.address 192.168.157.135/24

- Set Default Gateway
sudo nmcli connection modify 'Wired connection 1' ipv4.gateway 192.168.157.2

- Modify Configuration from Automatic to Static
sudo nmcli connection modify 'Wired connection 1' ipv4.method manual

- Set the DNS IP (Google DNS Server)
sudo nmcli connection modify 'Wired connection 1' ipv4.dns '8.8.8.8'

- Activate/Enable the Connection
sudo nmcli connection up 'Wired connection 1'

Note: To deactivate the connection, replace the “down” utility with the “up” utility in the above command.
Verify Static IP Address
ip a
Tip: Add or Delete Network Connection
Restart the NetworkManager service by typing sudo systemctl restart NetworkManager or reboot your system for the changes to take effect:
sudo nmcli connection add id connection_name # Add New Connection
sudo nmcli connection delete id connection_name # Delete Existing Connection
Finally, the static IP address has been set up on Debian 12 using nmcli command line tool.
Method 3: Set Up a Static IP Address on Debian 12 Using the nmtui
The nmtui is another part of the “NetworkManager” package that allows you to manage the network connections from a text-based user interface (TUI).
To set up a static IP address on Debian 12 using nmtui, follow these steps:
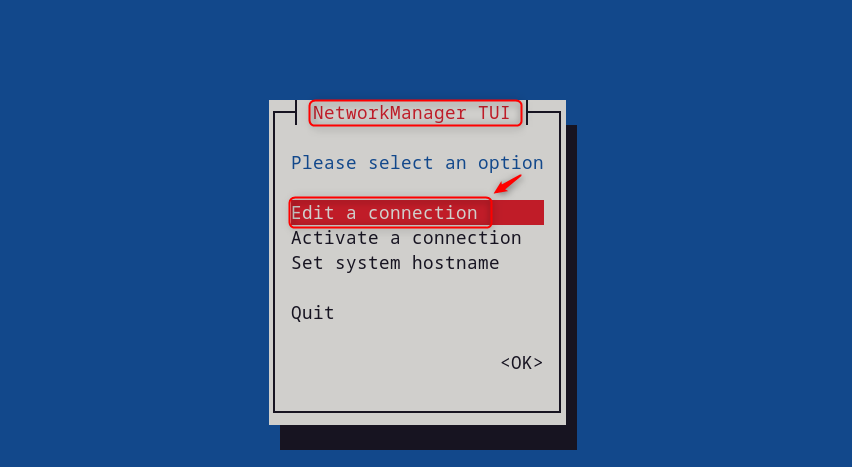
Step 1: Launch nmtui Interface
First, type “nmtui” command to launch the interface, use the arrow keys, and Enter key to navigate through the menus and options
Step 2: Edit a Connection
Select “Edit a connection” option and press Enter:
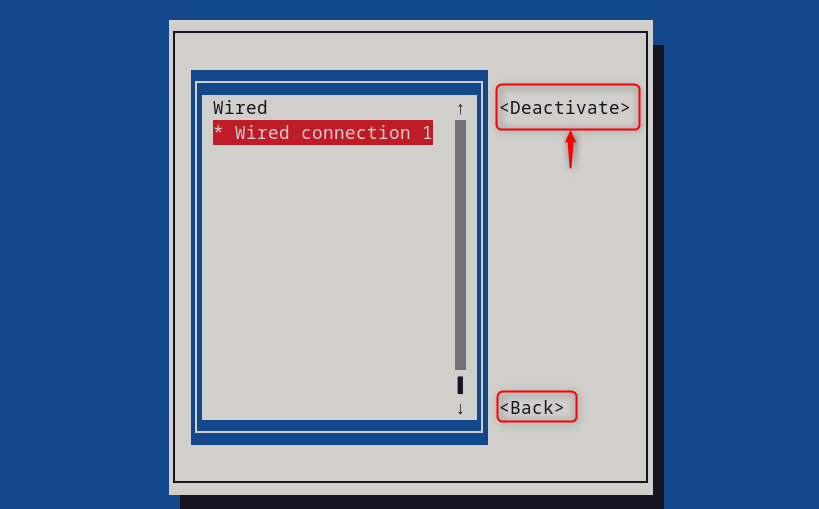
Select the connection (e.g., “Wired connection 1”) that users want to configure and press Enter:

It navigates to the “Edit a connection” interface. At there,
- Select “IPv4 CONFIGURATION” and press Enter. Pick “Manual” from the list and hit the “Enter” button.
- Select “Show” to add or edit the IPv4 addresses of the connection.
- Enter the static IP address (192.168.157.10), gateway(192.168.157.2) and DNS servers (8.8.8.8 8.8.4.4) of the connection that users want to assign to the connection.
Scroll down, and hit the “OK” button to save the address and return to the previous menu:

Step 3: Restart the NetworkManager Services
To restart the “NetworkManager” services hit the “Activate a connection” option: 
Then, press the “Activate/Deactivate” for the changes to take effect. Finally, back, and then “Quit” to exit the interface:
Step 4: Verify Static IP Address
Now, users can verify the Static IP address using the “ip” command with the “a” utility:
This section has set up/configured the static IP address on Debian 12 using nmtui tool.
Method 4: Set Up a Static IP Address on Debian 12 Using NetworkManager
The GUI method is an easy-to-implement method for static IP address configuration. To set up a static IP address using the graphical interface. Here are the steps:
Step 1: Click on the Network Icon
Click on the network icon on the top right corner of the screen and select “Wired Settings

Step 2: Access the Network Interface
In the “Wired” tab, hit the gear icon under the network interface for configuration:

Step 3: Edit Network Information
In the “IPv4” tab, switch the method from “Automatic (DHCP)” to “Manual”. After that, enter the IP address (192.168.157.135), subnet mask (255.255.255.0), gateway (192.168.157.135) and DNS servers (8.8.4.4, 8.8.8.8). Finally, click on “Apply” to save the changes:

Note: If a user found any issue, check the Gateway that remains the same as in the previous configuration located in the “Details” tab.
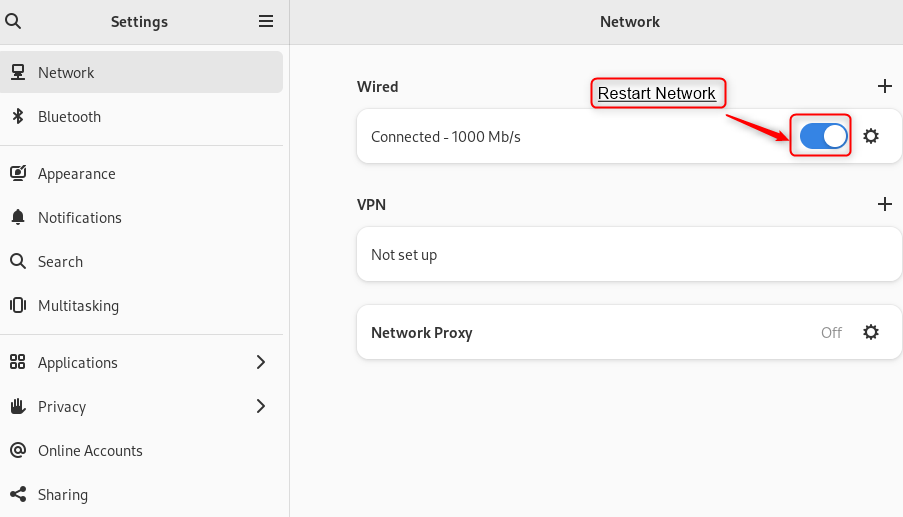
Step 4: Restart Network Interface
Now, restart the network interface via toggle button for the changes to take effect:
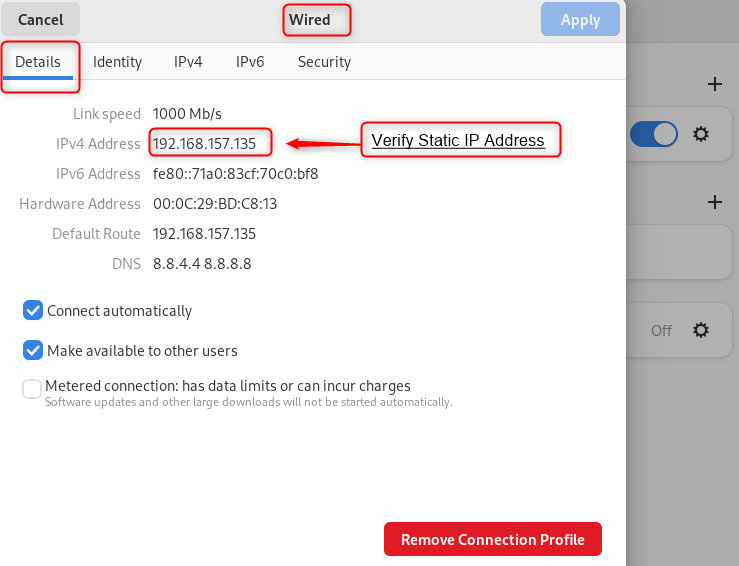
Step 5: Verification
User can verify the static ip address on settings by navigating to the “Detail” tab:
In this way, a static IP address has been set up on Debian 12 using the GUI.
Conclusion
Setting up a static IP address on Debian 12 is a simple and useful task that can improve your network security and stability. To set up a static IP address on Debian 12, use the “/etc/network/interfaces” file, the “nmcli” tool, and the “nmtui” interface.
Alternatively, use the “NetworkManager” graphical tool and configure the IPv4 settings for your connection. The easiest method is to use the “NetworkManager” tool to static IP addresses on Debian 12.
This guide has explained all possible ways to set up a static IP address on Debian 12.
