
How Do I Kill Processes in Ubuntu?
In Ubuntu or any other OS, a process refers to the application/program initiated by the user or the system in the background/foreground. There are times when you might need to kill a process, such as when it’s causing problems or not responding. Killing a process is the act of stopping it abruptly to get rid of any performance bug. Ubuntu offers numerous ways to assist its users to kill the process.
This article will provide you with a guide on how to kill processes in Ubuntu.
How Do I Kill Processes in Ubuntu?
Ubuntu being a widely used GUI-supported Linux distribution offers the “kill” and “pkill” commands and the “GNOME System Monitor” as the GUI application to kill the processes. While using the “kill” and “pkill” commands, it is recommended to get the process id of the process you want to kill.
Method 1: Using the kill Command to Kill the Processes
Before getting into the detailed usage of the kill command, let’s have a look at the syntax:
Syntax:
$ kill [Options/Signals] [Process-ID/Name] |
The kill command requires at least one argument, which is a Process-ID. It sends a signal to the specified process to terminate or perform other actions.
Let’s practice it to kill the process.
Example 1: Kill a Process With its ID
The command provided below will kill the process having “ID=5189”. Remember, if you get the error “operation not permitted”, then you need to use “sudo”:
$ sudo kill 5189 |

The process has been killed.
Note: To get the process IDs, you can use the “pidof processname” or the “top” command.
Example 2: Kill a Process Forcefully
What if you are unable to kill a process normally? The “kill” command offers the signal “9” to kill any process forcefully as we did here:
$ sudo kill -9 5187 |

The stated process has been forcefully terminated.
Note: There are other options of kill command as well that are not directly used to kill a process but they either stop or reload it.
The options can be viewed using the command:
$ kill -l |
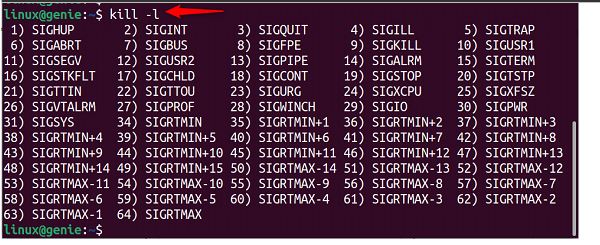
These options can be executed with their option number, name, or name without prefix. Like, the “2) SIGINT” can be executed with the option, “2”, “INT”, or “SIGINT”.
Method 2: Using the pkill Command to Kill the Processes
The “pkill” command as the name shows is the same as the “kill” command. However, the “pkill” offers to kill all the instances of the process or the processes owned by a specific user. This functionality is not provided by the kill command.
First, have a look at the syntax of the “pkill” command:
$ pkill [Options] pattern |
Here, the word “pattern” can be either the name of the process or the “regular expression” to kill all the matching processes.
For detailed usage of the pkill command, let’s practice some examples:
Example 1: Kill All Processes WIth its Name
The users can kill all the instances of the process by its name as shown in the following command:
$ sudo pkill firefox |

Example 2: Kill a Process Using its ID
Like kill command, the “pkill” command can also be used to kill the process using its ID. For this functionality, the “p” flag of the command is used:
$ sudo pkill -P 7862 |

The process having ID=7862 has been killed.
Example 3: Kill All the Processes of a Specific User
The “u” option of the “pkill” command can be used to kill all the processes of the specific user. As the command written below, will end all processes of the username “linux”:
$ sudo pkill -u linux |

Example 4: Kill All Processes That Matches a Pattern
The “regular expressions” are used to match the partial/complete pattern. For instance, the “carrot symbol ^” will match all the patterns starting with a specific word/pattern, Similarly, the “dollar sign $” will match all the patterns ending with the specific word.
The command provided below will kill all the processes whose name starts with “fire”:
$ sudo pkill "^fire" |
To kill a process that ends with a specific name, use the “$” sign as follows:
$ sudo pkill "fox$" |
To end all processes that contain a specific name, use that name in the quotes as follows:
$ sudo pkill -f "firefox" |

These were the command line methods, let’s now proceed to the GUI method.
Method 3: Using the GNOME System Monitor to kill the Process
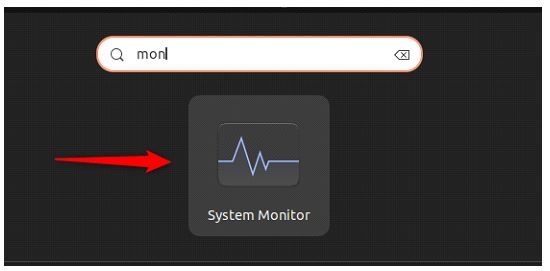
The GNOME system monitor is the GUI-based built-in application in Ubuntu. It contains details about the running processes and the number of system resources they are consuming, etc. This can be used to kill a process in Ubuntu.
Step 1: Open the GNOME system monitor from the applications menu:
Step 2: In the “Processes” tab of the monitor, the first column shows the Process Names. Right-click on the process name and then choose the “kill” option from the dropdown:
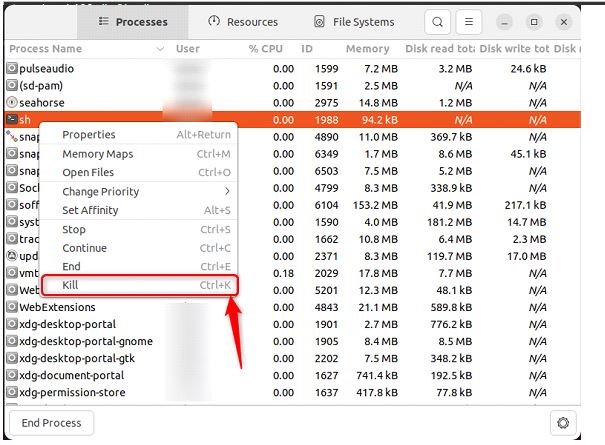
You can also select the process and use the shortcut key “CTRL+K” to kill that process.
Wrap Up
To kill a process in Ubuntu, the “kill” or “pkill” command and the GNOME system monitor can be used. The “kill” command uses the process id of the process to kill the processes normally or forcefully. While the “pkill” command offers the functionality of the kill command alongside it kills all the instances of the specific process or all the processes of the specific user. While a system monitor is a GUI method to kill the process.
All these methods to kill a process in Ubuntu are explained.
