How to Enable SSH on Linux Mint
SSH(Secure Shell) protocol is also known as a “Secure Socket Shell” that provides a secure way for connecting to a remote server over an unsecured network. Additionally, SSH is necessary for networking, transferring files, managing, and communicating with remote systems. SSH server package is not a default component on some Linux distributions including Linux Mint, Ubuntu, and Debian. It is available in the OS-based repository.
This tutorial will provide the easiest way to enable SSH on Linux Mint.
How Does SSH Work?
SSH is a client-server-based technology that is used to establish communication through secure channels. The SSH client uses the TCP port 22 by default. SSH uses an encrypted format that makes it impossible for other users to notice your performed operations and transferred data. Basically, SSH was created to replace insecure terminal emulation like rlogin (remote login), Telnet, and rshell (remote shell). Moreover, it also replaces file transfer programs, such as rcp (remote copy) and FTP (File Transfer Protocol).
Prerequisites: How to Install SSH(Secure Shell) on Linux Mint?
To enable SSH on Linux Mint, users first need to install the SSH server packages. For that purpose, perform the following procedure.
Step 1: Update System
Then, update your system by running the provided command:
sudo apt update && sudo apt upgrade
Step 2: Install SSH
Now, use the below-stated command to download and install the SSH packages along with dependencies:
sudo apt install ssh
Step 3: Verify SSH Installation
To verify whether the SSH has been installed or not, run the provided command:
sudo systemctl status ssh
How to Enable SSH on Linux Mint?
After completing the installation of SSH, you need to enable the SSH service by following the given steps.
Step 1: Enable SSH
Execute the following command to enable the SSH service:
sudo systemctl enable ssh
Step 2: Verification
After doing so, check the current status of the SSH service for verification through the below-provided command:
sudo systemctl status ssh
The given output shows that the SSH service has been enabled.
How to Configure SSH Connection Through Firewall on Linux Mint?
If you are running the firewall on your system then you need to allow SSH service for the firewall because it restricts the connection between the server and client by blocking port 22. For that corresponding purpose, check out the given procedure.
Step 1: Allow SSH Connection
To allow the connection on the SSH port, use the “ufw” command:
sudo ufw allow sshAfter executing the above command, rules have been added to your firewall for allowing the SSH connection:

In the above-given command, “ufw” is an “Uncomplicated Firewall” that is used to manage the Linux firewall.
If the firewall is currently disabled, then enable it by executing the provided command:
sudo ufw enable
Step 2: Enable new Configuration(reload)
In order to implement the new configurations, you are required to reload the firewall through the following command:
sudo ufw reload
Step 3: Check Firewall Status
If you want to check the current status of the UFW firewall along with details, then run the below-given command:
sudo ufw status verbose
How to Access SSH Server Through SSH Client?
First, make sure that both machines have SSH installed and enabled. Additionally, you should know the IP address and username of the machine that you want to connect to.
First, get the IP address of a particular machine by running the below-given command:
ifconfig
Alternatively, the provided command can also be used for finding the IP address of the system:
ip addr showNow, access your system from another machine by executing the provided command along with the username and IP address:
Here, “linuxmint” is our username, and “192.168….” is our machine’s IP address:
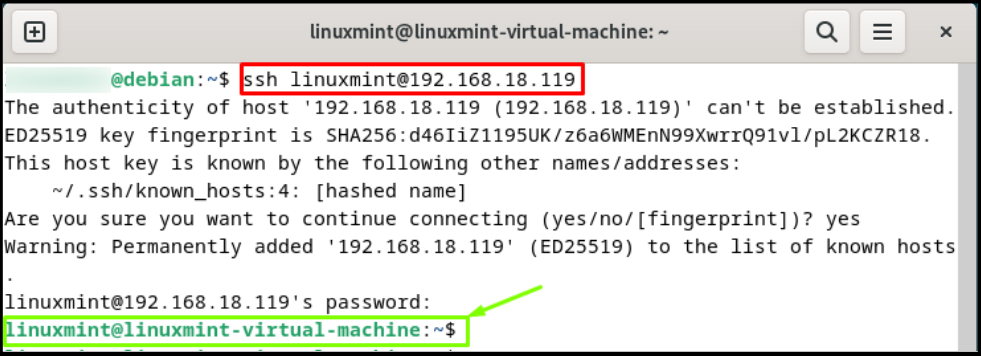
Additional detail: If you are connecting to the server for the first time, then a message appears on the console asking you to confirm the connection by typing “Yes” and hitting the “Enter” key to confirm the identification of the remote server on the local machine. Then, provide your remote server password for logging in to it.
You can close this connection by executing the following command:
exitHow to Modify SSH Configuration File on Linux Mint?
On Linux Mint, the root login over SSH is not permitted by default. However, you can allow root login by modifying the SSH configuration file. To do so, run the provided command:
sudo nano /etc/ssh/sshd_configAs a result, the configuration file will be opened with your specified editor. Now, you can change the required values:

After performing the required changes, save changes, press “Ctrl + X”, and close the file.
How to Disable SSH on Linux Mint?
Users want to disable the SSH on their system for any reason, first, they need to stop the SSH service through the given command:
sudo systemctl stop ssh
Then, execute the following command to disable the SSH service:
sudo systemctl disable ssh
Afterward, confirm the above-performed operation by checking the current status of the SSH server:
sudo systemctl status sshThe following output indicates that the SSH service has been disabled and an inactive state:

How to Remove SSH Service From Linux Mint?
If you don’t need the SSH service anymore and want to remove it from your Linux Mint system, use the given command:
sudo apt autoremove ssh
For verifications, execute the below-stated command:
sudo systemctl status ssh
Sum-Up
SSH support allows users to connect through client/server terminology and also has a file transfer feature. All these operations are performed in a secure manner to overcome any security breach. The “sudo systemctl enable ssh” command is used to permit the SSH service. The Linux Mint is not equipped with SSH by default. However, it can be installed using the “sudo apt install ssh” command. This write-up provided the procedure for installing and enabling the SSH service on Linux Mint.
