
How to Install Java on Linux Mint 21?
Java is a versatile as well as powerful programming language that can help you create various applications and run them on multiple platforms. It is widely utilized for developing web applications, desktop applications, mobile applications, and more. If users want to run Java applications on the Linux Mint system, they need to install Java on it.
There are two main versions of Java: “Oracle Java” and “OpenJDK”. Oracle Java is the proprietary version of Oracle, and the second one is open-source. Both versions can run Java applications, but some applications may require Oracle Java. The Java Runtime Environment (JRE) is just for running Java applications, while the Java Development Kit (JDK) is also for development purposes.
This guide will demonstrate all the possible paths to install Java on Linux Mint 21 with step-by-step instructions.
- How to Install Java on Linux Mint 21?
- How to Compile/Run a Java Program on Linux Mint 21?
- How to Install Java on RHEL-based Linux Distributions?
How to Install Java on Linux Mint 21?
Linux Mint comes with a default Java package that provides the JRE and the JDK. There are different ways to install Java on Linux Mint 21, depending on preferences as well as needs. The supported methods are given below:
- Method 1: Using the APT Repository
- Method 2: Using the PPA Repository
- Method 3: Using the Official Oracle Website
- Method 4: Using the Software Manager
Method 1: Install Java on Linux Mint 21 Using the APT Repository
To install the latest or stable Java package on Linux Mint 21, update the system packages, install the default Java Development Kit (JDK), and verify the installed version of Java. The step-by-step instructions are given below:
Step 1: Update System Packages
Before installing Java on Linux Mint 21, it is recommended to update the system repositories. It updates the system packages list and is ready to install Java on Linux Mint 21:
sudo apt update

Step 2: Install Java (By Default)
To install Java on Linux Mint 21 from the APT repository (by default), use the “default-jdk” package name with the “Install” utility. It installs Java along with all dependencies that come from the APT (by default) repository:
sudo apt install default-jdk

Optional: Install Java Runtime Environment
To install the JRE on Linux Mint 21, use the “default-jre” with the “install” utility:
sudo apt install default-jre

It confirms that the “default-jre” package is already installed with the installation of “default-jdk” package (in above step).
Optional: Install Java Specific Version (Latest)
To install a particular/specific Java version on Linux Mint 21, use the “openjdk-<version_name>-jdk” package. For instance, install the Java “21” version (the most recent release from the official Java website) on the Linux Mint terminal:
sudo apt install openjdk-21-jdk

Step 3: Check Installed Java Version
To check if Java is installed correctly, use the “java” and “javac” commands with the “version” utility. It confirms that JRE and JDK have “21.0.2” and “21.0.1” versions, respectively:
java -version # Check Java Version (JRE)

javac -version # Check Java Version (JDK)

Step 4: Set the JAVA_HOME Environment Variable
Some applications may require users to set the “JAVA_HOME” to the Java installation (location). To do this, find out where Java is installed on the system using the “update-alternatives” command:
sudo update-alternatives --config java

In our case, it displays only one path.
Optional: For Multiple Environment Variable Paths
If found more than one path, type the selection number from “0 to 3” or keep current changes by hitting the “Enter” button as below:

Alternative Way: Edit the “/etc/environment” File
To set only one “JAVA_HOME” environment variable such as “Java 11” version, edit the “/etc/environment” file with the text editor such as “nano”:
sudo nano /etc/environment
At the end of this file, add the following line to set the location of the Java installation of “11” version:
JAVA_HOME="/usr/lib/jvm/java-11-openjdk-amd64/bin/jav"

Save and close the file.
Then, apply the changes by running the following command:
source /etc/environment

To verify that the “JAVA_HOME” environment variable of “Java 11” is set correctly, use the “echo” command:
echo $JAVA_HOME

Finally, Java has been successfully installed on Linux Mint 21 using the APT repository.
Optional: Remove/Uninstall Java on Linux Mint 21
To completely remove/uninstall Java on Linux Mint 21, specify the “default-jdk”, “default-jre” or “openjdk-<version_name>-jdk” package name with the “autoremove” utility:
sudo apt autoremove default-jdk # Completely Remove Java (JDK)

sudo apt autoremove default-jre # Completely Remove Java (JRE)

sudo apt autoremove openjdk-<version_name>-jdk # Completely Remove Java (Specific Version)

Note: Users can also use the “purge” or “remove” utility as the replacement of “autoremove” to partially remove Java on Linux Mint 21.
Method 2: Install Java on Linux Mint 21 Using the PPA Repository
The PPA repository provides pre-built packages for various versions of Java. To install Java on Linux Mint 21 from a PPA repository, add the “linuxuprising/java” PPA repository. Then, install the specific package by following these steps:
Note: Java 11 (LTS) and 17 (LTS) are only available for Linux Mint 21 using the PPA repository method.
Step 1: Add PPA Repository
Firstly, add the “linuxuprising/java” PPA repository that provides Java packages based on preferences via the following command. It installs available Java packages on Linux Mint 21:
sudo add-apt-repository ppa:linuxuprising/java

Step 2: Update Packages List
Now, update the packages list from the system with the “update” command with the “sudo” privileges:
sudo apt update

Step 3: Install Java 17 (LTS)
To install Java 17 (stable release) on Linux Mint 21 from the PPA repository, use the “oracle-java17-installer” or “openjdk-17-jdk” or “openjdk-17-jre” packages with the “install” utility (based on needs). In our case, install the “Oracle Java 17 JDK” as below:
sudo apt install oracle-java17-installer # Installs the Oracle Java 17 JDK

sudo apt install openjdk-17-jdk # Installs the OpenJDK 17 JDK

sudo apt install openjdk-17-jre # Installs the OpenJDK 17 JRE

It navigates to the new interface of “Package configuration”. Now, hit the “Ok” button to further proceed the Java installation:

Furthermore, users may require accepting the license agreement by pressing the “Yes” option and wait for the installation to complete:

Step 4: Verify Installed Java Version
To verify that Java 17 is correctly installed or not, execute the “version” utility with the “java” command. It confirms the Java installation along with the “17.0.6” version:
java -version

Optional: Set Java as the Default Version
To set Oracle Java as the default version on Linux Mint 21, use the “oracle-java17-set-default” package name with the “install” utility:
sudo apt install oracle-java17-set-default

It confirms that Oracle Java is already set as the default version.
Optional: Remove/Uninstall Java Using PPA Repository
To uninstall/remove Java from Linux Mint 21, specify the PPA repository name “linuxuprising/java” with the “remove” utility as below:
sudo add-apt-repository --remove ppa:linuxuprising/java

It removes the PPA repository from Linux Mint 21. For further removal of the specific Java package, follow removal section of Method 1.
Method 3: Install Java on Linux Mint 21 Using the Official Oracle Website
A third way to install Java on Linux Mint 21 is to use a tarball (a compressed file that comprises binaries as well as libraries of Java) from the official Oracle website. This method ensures the latest as well as most secure version of Java.
To install Java 21 from the official Oracle website, follow these steps:
Step 1: Download Java (Latest Version 21)
Go to the official Oracle website and click on the Linux “x64 Compressed Archive” link under Java SE Development Kit 21. Then, download the tarball of the Java version that users want to install from the official website:

Optional: Users can also use the “wget” command to download the latest Java version from the terminal:
wget https://download.oracle.com/java/21/latest/jdk-21_linux-x64_bin.tar.gz
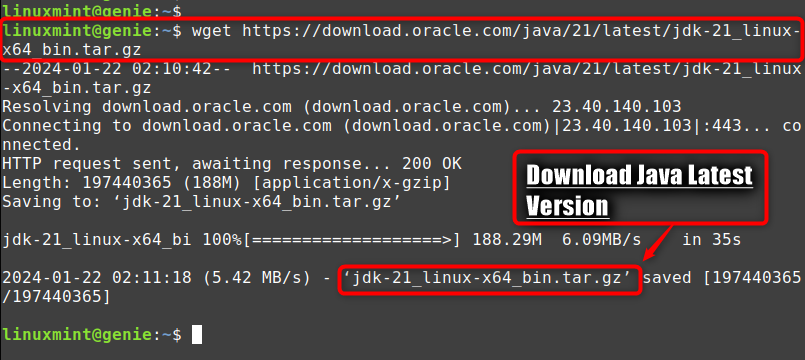
It downloads in the home directory that corresponds to the system architecture (x64 or aarch64).
Step 2: Extract the Java Tarball
Now, extract the tarball in the same directory by entering “tar xvf <filename>”. So, the filename is “jdk-21_linux-x64_bin.tar.gz” which downloads Java 21 for x64 architecture:
tar xvf jdk-21_linux-x64_bin.tar.gz

Step 3: Move Extracted Folder
After that, move the extracted folder to “/usr/lib/jvm” by using the “mv <foldername> /usr/lib/jvm” command. Here, the extracted folder name is “jdk-21.0.2”:
sudo mv jdk-21.0.2 /usr/lib/jvm

Step 4: Install and Configure Java as the Default Version
Users can also set the extracted folder as the default Java version by following the below commands. Here, the “jdk-21.0.2” is the folder name that user can modify based on the extracted folder name:
sudo update-alternatives --install /usr/bin/java java /usr/lib/jvm/jdk-21.0.2/bin/java 1

sudo update-alternatives --install /usr/bin/javac javac /usr/lib/jvm/jdk-21.0.2/bin/javac 1

Alternative Way: Configure Java PATH Variable
The path that users need is the one that is selected by default (marked with an asterisk). In this case, it is “/usr/lib/jvm/java-11-openjdk-amd64/bin/java”. So, select Java 21 that is extracted in this section:
sudo update-alternatives --config java

Users need to type the “Enter” button for the current choice, or enter the selection number just as “2” to select Java 21 (recently installed version).
Bonus Tip: Users can also update the PATH variable with the location of the Java 21 bin folder by executing the below command:
export PATH=/opt/java/jdk-21/bin:$PATH
Tip: To make this change permanent, edit your ~/.bashrc file and add the same command at the end of the file.
Step 5: Check Java Installed Version
Verify that the installation was successful by entering the “version” utility. It confirms that Java has been installed with the latest “21.0.2” and JRE with the “21.0.1” version:
java -version

Optional: Remove/Uninstall Java on Linux Mint 21
To completely remove Java from Linux Mint 21, use the “autoremove” utility by specifying the package name. For instance, “openjdk-21*” is selected below:
sudo apt remove --autoremove openjdk-21*

It completely removes Java 21 from Linux Mint.
Method 4: Install Java on Linux Mint 21 Using the Software Manager
The easiest way to install Java on Linux Mint 21 is to use the Software Manager. This method allows you to install Java through the official Linux Mint repositories.
To install Java from the Software Manager, follow these steps:
Step 1: Launch Software Manager
Open the Software Manager from the menu by mentioning “software-manager” or by pressing “Alt+F2” shortcut:

Step 2: Search Java Packages
Search for “openjdk” in the search box and choose the package that matches your system architecture (32-bit or 64-bit) and Java version. Then, select “Openjdk-21-jre” or “Openjdk-21-jdk”:

Note: If you want to install Oracle Java, which is the official version of Java from Oracle, select “Oracle-java21-installer” or “Oracle-java21-set-default”.
Step 3: Install Java (Latest Version)
Now, click on the “Install” button in the new interface and hit the “Continue” button to install all other dependencies:

Step 4: Check Java Version
Wait for the installation to complete and verify that Java is installed. It confirms the installation of Java with the latest version:
javac -version

Optional: Remove/Uninstall Java on Linux Mint 21
To remove the installed Java package from Linux Mint 21 on Software Manager, press the “Remove” button by searching for a specific package. Then, hit the “Continue” button to remove all dependencies:

In this way, the uninstallation of Java has been done via the “Software Manager”.
By following these methods, users can install Java on Linux Mint 21 and start developing their own applications.
How to Compile/Run a Java Program on Linux Mint 21?
To compile and run a Java program in Linux Mint 21, users need to have the JDK installed on the Linux Mint system. For further procedure, follow the below steps:
Step 1: Create a Java File
To compile and run a Java program, users need to create a file with the “.java” extension that contains the source code. For instance, create a file called “linuxgenie.java” that contains the following code:
sudo nano linuxgenie.java

Java Code
public class linuxgenie {
public static void main(String[] args) {
System.out.println("Linuxgenie is Trending Tech Site!");
}
}
Step 2: Compile Java File
To compile this file, navigate to the directory where the file is saved. Then, type “javac linuxgenie.java” and press enter. It creates the file named “linuxgenie.class” that contains the bytecode of the program:
javac linuxgenie.java

Step 3: Run Java Program on Linux Mint 21
To run the program on Java, type “java linuxgenie” in the terminal and press enter. This executes the bytecode and prints the output of Java code on the screen:
java linuxgenie

In this way, users compile and run a Java program on Linux Mint 21.
How to Install Java on RHEL-based Linux Distributions?
If users want to install Java on a RHEL-based Linux distribution, such as CentOS, Fedora, or Red Hat Enterprise Linux, they can follow these steps:
Step 1: Download the latest Java Development Kit (JDK)
Download the latest Java Development Kit (JDK) from the official Oracle website. For this, pick either the OpenJDK or the Oracle JDK.
Step 2: Extract the Downloaded File
Now, extract the file and use the command “tar xzf jdk-<version>-linux-<arch>.tar.gz -C /opt/java” to extract the file, where “<version>” and “<arch>” are replaced by the actual values of your downloaded file.
Step 3: Set the Environment Variables
To set the environment variables for Java by editing the “/etc/profile” file. For this, use “nano” text editor. Add the following lines at the end of the file, where “<version>” is replaced by the actual value of the JDK version:
export JAVA_HOME=/opt/java/jdk-<version>
export PATH=$PATH:$JAVA_HOME/bin
Save and close the file, and then run the command “source /etc/profile” to apply the changes.
Step 4: Verify Java Version
So, verify the current version of Java on the system by running the “version” command.
java -version
Finally, You have successfully installed Java on your RHEL-based Linux distribution. You can now use Java to develop and run applications on your system.
Conclusion
Java runs on several platforms, including Linux Mint. To install Java on Linux Mint 21, use the “openjdk-<version_name>-jdk”, “openjdk-<version_name>-jre” packages on the APT repository, PPA repository, and Software Manager. Or, download the latest and secure Java version from the official Oracle website by clicking on the “.tar.gz” file and install it.
This article has shown how to install Java on Linux Mint 21 using different methods. Also, explain how to set up the Java environment variables or switch between different Java versions and how to compile and run Java program/s on Linux Mint 21.
