How to Create a Bootable USB for Ubuntu 22.04 in Windows
Unlike the prime years of the CD/DVD Rom, if you want to install a new/fresh operating system on your computer, where you would just insert the CD/DVD into the drive and start the installation from there if you want to do that now, you need to know how to create a bootable USB. Though there are multiple tools for Windows and Linux, you need to know how to operate them in order to successfully make a bootable USB.
In this guide, we will take a look at multiple tools you can use to create a bootable USB for Ubuntu 22.04.
Using UNetBootin
You can use UNetBootin on all the major operating systems out there. To get started, head on over to the official website (https://unetbootin.github.io/). From here download the apt version for your operating system. Since we are using Windows, we will be downloading a relevant version.

The installer is just 4.6MBs big. As soon as it is downloaded, open it up to get started without any need for installation.
Here you are presented with two options. With the first option, you can select from a range of Linux distributions and their versions. For Ubuntu you can select the following:
With the second option, you can select an already downloaded ISO image for the process. So, select your image, and select which USB drive you want to make bootable (if you have multiple sticks connected to your computer).
Please note that this process will erase all data from your device and write the installation files on your USB drive. Now that you’re ready to start the process you can go ahead and click “OK”. This will start the process.
You can ignore the extra tiny dialog box that opens ups. It’s just a bug that’s persisted for a while. It won’t affect the process. Depending on the version and your computer hardware, the whole process will take some time and complete in a couple of minutes.
And once this is done, you can simply stick this USB stick into the desired computer and boot using it to get into Ubuntu.
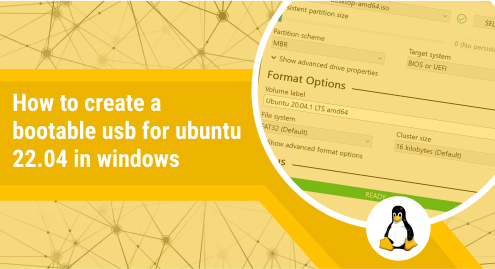
Using Rufus
Rufus is another popular option for creating bootable USB drives for Ubuntu. With it, you get a little more control over the process. You can download it from their official website (https://rufus.ie/en/). Similar to UNetBootin, it doesn’t require an install to start creating a bootable USB for you. Once you launch it, you will be greeted with a similar screen.
“NO_LABEL (H:)” is the name of my USB drive I am going to make bootable for Ubuntu 22.04. Under it, click on “Select” to select the ISO image that you have downloaded.
Once you’ve selected the image, it will enable a couple of options for you. If you are unsure of anything, just select start and it will start the process for you. Generally, these default options work with every computer. In the next window, you will be prompted to select between “ISO Image mode” and “DD Image mode”.
You can select the options per your situation. Once you select any option, you will be prompted that all the data will be erased.
It serves as a nice little reminder, if you have any data on your USB drive. Once you select to continue, the status section will be updated to reflect the accurate state of the process.
Similar to UNetBootin, once this is done, you are ready to stick your USB drive into any computer and start installing Ubuntu 22.04. You will not get any specific prompt when the process is done, the Status section will be updated to look like below:
Conclusion
In this guide we looked at two most commonly used tools to create bootable USB drives. There are many other options available for you to download, as well, but these two are very user friendly and error-proof. You can play around with the settings and the options available to adjust the output as per your desire. So, if you run into any issues with these tools, feel free to drop a comment below and start a conversation thread around it.
