How to Install Linuxmint 21.1 Xfce (LTS) Edition
Linuxmint is a popular operating system for Linux users. It provides three different variants, such as Cinnamon, Mate, and Xfce. Among these variants, Xfce is famous for its lightweight and efficient desktop environment. Linuxmint Xfce edition provides simple and user-friendly software management to install applications. Although it does not support features like Cinnamon and Mate, it offers pre-installed applications for its users.
The main aim of this article is to capacitate you on how to install the Linuxmint 21.1 Xfce edition on your system.
How to Install Linuxmint 21.1 Xfce (LTS) Editon?
The step-by-step process below will install the Linuxmint 21.1 Xfce (LTS) edition on your system.
Step 1: Official Website of Linuxmint
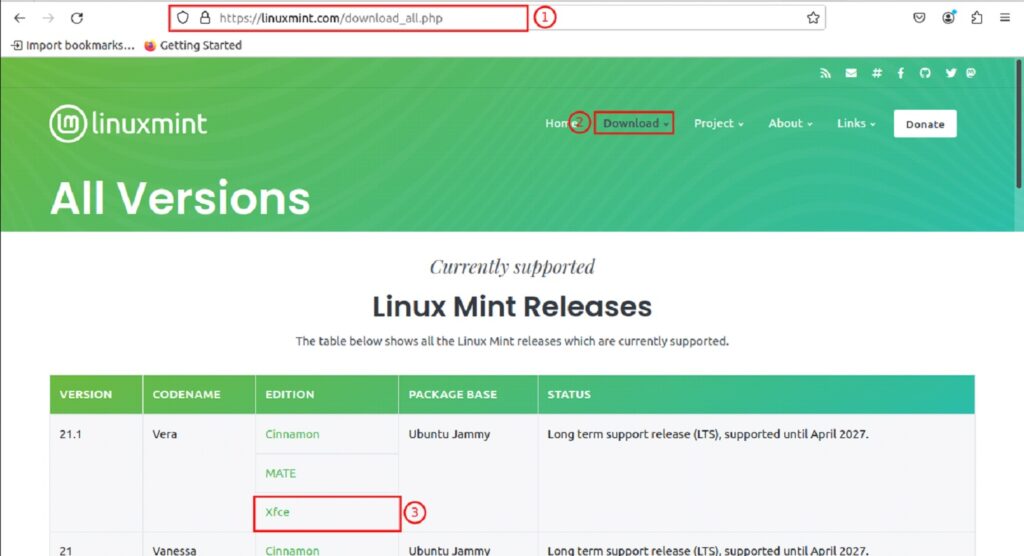
First of all, you need to visit the official website of Linuxmint to download the media. From your browser, visit to Linuxmit website and go to the Download tab, choose the All Versions option, and select the Xfce version of Linuxmint as shown in the below snapshot:

Step 2: Choose the Linuxmint Xfce Edition
After choosing the Xfce edition from the Editions list, a new window will appear on your screen with the following interface. You can download the torrent file from here:

Step 3: Download the Linuxmint Xfce in ISO
If you don’t want the torrent file, scroll down and choose the Mirror link of your choice. In our case, we have selected the World Mirror to download the Linuxmint 21.1 Xfce in ISO format:

Step 4: Navigate to the Downloaded Media
Navigate the downloaded media of Linuxmint 21.1 Xfce edition. For instance, we have successfully downloaded the media in Home/Downloads/Linuxmint-21.1-xfce:

How To Launch VirtualBox Virtual Machine?
Step 1: Launch VirtualBox Virtual Machine
To launch VirtualBox (virtual machine), go to the Applications, search the keyword “VirtualBox” in the search bar, and click on the Icon of VirtualBox, as demonstrated below:

Step 2: Create a New Virtual Machine
Choose the New option from the tabs to create a new virtual machine environment in VirtualBox:

Step 3: Specify Machine Name and Fix the RAM size
In this section, type the name of your choice for the operating system, choose the path for a new machine, and select the version of your operating system. Choose the “Other Linux (64bit) from the drop-down list. After fixing the RAM size, click on Create button:

Step 4: Give Path and Allocate Hard Disk Size
Give the path of the Linuxmint files in your hard disk and allocate a minimum of 20 GB size for your new virtual machine. Go to the next step by clicking on Create button:

Step 5: Start Linuxmint Virtual Machine
In VirtualBox, select the new machine such as Linuxmint. Click on the Start button to start the Linuxmint machine:

How to Upload Linuxmint Media (ISO)?
Step 1: Upload Linuxmint Media
In the “Select the startup disk” section click on the Upload button to locate the ISO file from the hard disk:

Step 2: Add Linuxmint Media from the Path
Click on Add button in the Optical Disk Selector to jump into the hard drive:

Step 3: Attach the Linuxmint-21.1-Xfce-64bit.iso
Navigate the Linuxmint-21.1-Xfce-64bit.iso file from the hard disk and select the Open button from the top right corner:

Step 4: Select the Linuxmint Media
After adding the Linuxmint-21.1-xfce-64bit.iso from the path, it will appear in the Optical Disk Selector list. Choose the media as illustrated below and click on the Choose button to move forward:

Step 5: Confirmation
Confirm the media and click on the Start button:

How to Install Linuxmint 21.1 Xfce Edition?
Step 1: Initiate Linuxmint 21.1 Xfce
From the command line interface, choose the first option containing the message “Start Linux Mint 21.1 Xfce 64-bit” and press enter from your keyboard:

Step 2: Install Linuxmint 21.1 Xfce
Double-click on the Install Linux Mint as shown in the below-mentioned snapshot, to initialize the installation process:

Step 3: Choose a System Language
From the language list, choose the Language of your choice and press the Continue button:

Step 4: Choose Keyboard Layout
Choose your keyboard layout from the given list. For instance, we choose English (US) and press the Continue button:

Step 5: Install Multimedia Codes
Check the empty box if you want to install multimedia codecs for videos. Go to the next step by clicking the Continue button:

Step 6: Erase the Disk and Install Linuxmint
At this stage, the system will ask you to choose your Installation type. In our case, we chose the first option “Erase Disk and Install Linux Mint”, clicked on Install Now, and then confirmed to apply the changes by pressing the Continue button:

Step 7: Select Timezone
Select your desired Timezone from the map and click on Continue:

Step 8: Enter Credentials
Enter your credentials for the Linuxmint such as Name, Computer Name, and Password, and proceed to the next step by pressing the Continue button:

Wait till the system’s necessary files copy to the system:

Step 9: Restart Your System
Once the system’s necessary files are copied, a dialogue box will appear on your display with the message “Installation has finished…”. Hit the Restart button to save the changes and restart your system:

Step 10: Launch Linuxmint 21.1 Xfce Edition
After restarting the system, enter your password and hit enter to start Linuxmint 21.1 Xfce edition:

Finally, you got the message “Welcome to Linux Mint”. Enjoy the Linuxmint Xfce edition:

Conclusion
Install Linuxmint Xfce, a lightweight desktop environment, on your system using ISO image. The ISO image can be downloaded from the Linuxmint website. You can install the Linuxmint Xfce using a bootable USB or run it in the VirtualBox virtual environment. In this learning-based write-up, we have guided you through the detailed process of Linuxmint Xfce installation. Additionally, we have guided you on how to create a virtual environment for the Linuxmint Xfce edition.

