How to Install and Configure VMWare Workstation Pro 17 on Ubuntu 22.04
VMWare Workstation Pro 17 is the latest and widely used virtualization software to create and manage different operating systems on a single machine. It offers a limited-time free version but you can purchase its license for a long time. VMWare Workstation provides advanced features and functionalities for developers to test their codes without any compatibility issues.
In this post, we will guide you through the step-by-step process of installing and configuring the VMWare Workstation Pro 17 on Ubuntu 22.04.
How to Install VMWare Workstation Pro 17?
To install and set up the VMWare Workstation Pro 17 on Ubuntu 22.04, follow the sequential steps given below:
Step 1: Download VMWare Workstation Pro 17 via the “wget” command
wget is a freely available software utility that enables users to download files from specified URLs or links. To retrieve the VMWare package from the source link, run the command followed by the GitHub link:
wget https://github.com/mkubecek/vmware-host-modules/archive/workstation-17.0.0.tar.gz |

Step 2: Extract the Workstation Pro 17
In Ubuntu, the tar command is used to extract the compressed files such as the workstation-17.0.0.tar.gz.
tar -xzf workstation-17.0.0.tar.gz |

Step 3: List the New Packages
You can verify if the workstation-17.0.0.tar.gz has been extracted properly or not:
ls |

Step 4: Change Directory to VMWare Workstation
Run the cd command to enter the extracted directory. The example command is given below for your reference:
cd vmware-host-modules-workstation-17.0.0 |

Step 5: Create the Module “vmmon.tar”
Create the vmmon.tar module using the command mentioned below:
sudo tar -cf vmmon.tar vmmon-only |

Step 6: Create the Module “vmnet.tar”
Repeat the above-mentioned command followed by vmnet.tar module:
sudo tar -cf vmnet.tar vmnet-only |

Step 7: Copy the “vmmon.tar” and “vmnet.tar” to Source Directory
Run the cp command with the following pattern to copy the modules “vmmon.tar and vmnet.tar” to the source directory:
sudo cp -v vmmon.tar vmnet.tar /usr/lib/vmware/modules/source/ |

Step 8: Install All Available Modules
Once all the modules are copied to the source folder, run the following command from the terminal to install all the modules on your Ubuntu machine:
sudo vmware-modconfig --console --install-all |


The above-attached snapshot shows that all the available modules have been installed on the Ubuntu machine.
How to Configure VMWare Workstation Pro 17?
The below steps will be used to configure the VMWare workstation.
Step 1: Launch VMWare workstation
To launch a VMWare workstation, go to the Ubuntu Applications and search for the keyword “VMWare workstation”. Press on the Icon that appeared on your screen to start the configuration process:

Step 2: Accept the License Agreement
At the beginning of the configuration process, VMWare will ask you about accepting license agreements. Check the first option to accept the terms and proceed next:

Step 3: Accept the Other Terms
In this stage, VMWare will ask for some additional terms in the license agreement. You can accept them by clicking on the first option and then press on the Next button to proceed with the configuration process:

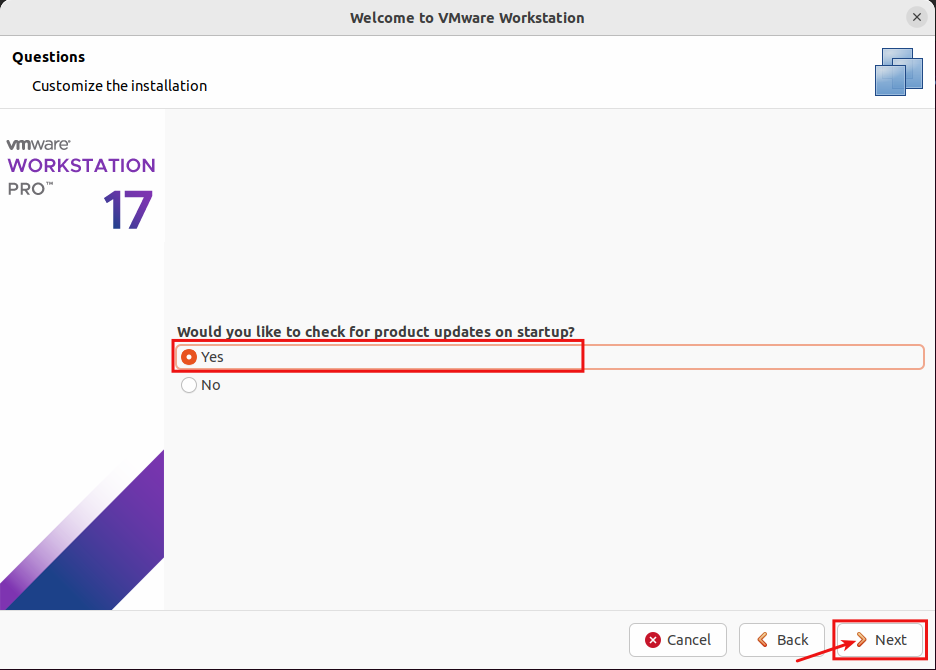
Step 4: VMWare Updates
Before pressing on the Next button, check the “Yes” option if you want to know about the new product updates from VMWare:
Step 5: Join VMware Customer Experience
You can either choose yes or no to join the VMWare customer experience improvement program. Pressing the Next button will move forward:

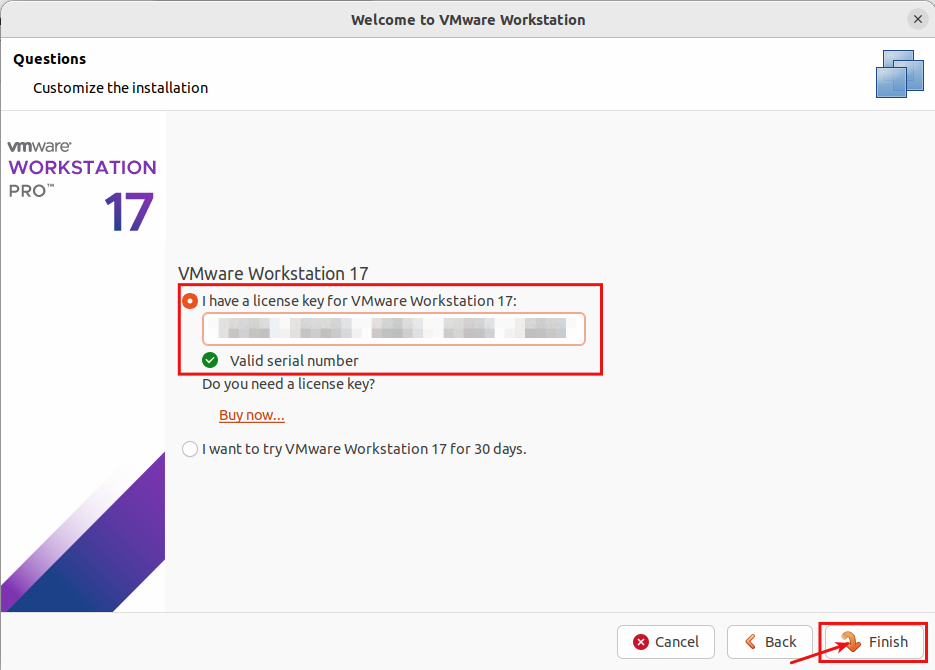
Step 6: VMware License Key
Enjoy the product for 30 days without any charges. However, you can also buy a license key to enjoy all the features without any hassle:
You have finished the configuration process of VMWare Workstation Pro 17.
Step 7: Authentication Required
As the superuser, enter your system password and press on Authenticate button for authentication:

Finally, click the OK button to enjoy the VMware Workstation:

The VMware Workstation Pro 17 interface will look the same as mentioned below:

Now, create a new virtual machine, open the existing machine, or connect a remote server with the VMware Workstation Pro 17.
Conclusion
VMWare Workstation is a tool that lets you create and handle various Operating Systems within a virtual environment. To download the source file of VMWare from the provided link, you can use the “wget” command in the terminal. You can install and configure the VMWare Workstation Pro 17 on Ubuntu 22.04 using a few steps.
In this learning-based article, we practically demonstrated the completed process of installation and configuration of VMWare Workstation Pro 17 on Ubuntu.
